The Listing block is useful for cataloging information and displaying content in a way that is easy to scan.
The listing block has two built-in fields for content: left side and right side, which offers the option of associating those two pieces of content with each other.

A listing is also helpful because it can be styled in columns to minimize scrolling.
When to use listings
For content from which visitors will scan, such as:
- People/group/entity names and titles
- Class schedules
- Lists of resources
- Event schedules
One-column listing, left side content only
| Cory Bradley Post-Doctoral Researcher, School of Medicine | |
| Derek Brown Associate Professor | |
| Leopoldo Cabassa Professor, Director, PhD Program in Social Work |
One-column listing, left and right side content
| 8:30-10 a.m. | Registration and check-in |
| 9-9:45 a.m. | Opening Plenary |
| 10 a.m. | Chancellor’s Remarks |
Two-column listing, left content only
In a two-column listing, the block will automatically wrap the listing items into the columns and visually balance column depths.
| Cory Bradley Post-Doctoral Researcher, School of Medicine | |
| Derek Brown Associate Professor | |
| Leopoldo Cabassa Professor, Director, PhD Program in Social Work | |
| Patricia Cavazos-Rehg Professor, Department of Psychiatry, Washington University School of Medicine | |
| Rajan Chakrabarty Harold D. Jolley Career Development Associate Professor | |
| Randi Foraker Professor, Division of General Medical Sciences, School of Medicine | |
| Patrick Fowler Associate Professor, Director, Doctoral Programs in Public Health Sciences | |
| Catalina Freixas Associate Professor | |
| Elvin Geng Professor of Medicine | |
| Byron Powell Associate Professor |
How to add the Listing block
- Add a listing block. By default, the block starts with three individual Listing items.
(If you don’t need three Listing items, you can delete one by clicking on the three dots in the far right corner of the formatting bar and selecting “Remove listing item”.) - Click on the Left side content and enter text.
- Select text and style it as Bold from the pop-up Formatting bar, if needed. And/or add a link.
- If you are using the Right side content area, click that area and repeat.
- Left and right side content areas can be styled in the sidebar of the page editor with toggles labeled Make left side content large or Make right side content large. For example:
| Academic Year | This is the amount of the academic work measured in either credit or clock hours you must complete each year, and the time period in which your are expected to complete it, as defined by your school. |
| Award Amount | Amount of aid a school expects to pay a student based on the student’s current grant and loan eligibility, enrollment, Expected Family Contribution (EFC), and the school’s cost of attendance. |
| Award Letter | This is a term sometimes used for an offer from a college or career school that states the type and amount of financial assistance the school is willing to provide if you accept admission and register to take classes at that school. |
Add additional Listing items
- At the top left of the Page editor, click on the Document overview icon (looks like 3 steps) to open the list view of blocks currently on the page.
- Click on the Listing block in the Page editor to activate it. A blue outline around the active block will appear with a black + icon (Add block) in the bottom right corner.
- Click the + icon (Add block) underneath the block you are working on to add more listing items as necessary.
Delete Listing items
Click on the listing item that you want to delete and select Options (three dots) from the right side of the pop-up Formatting bar. Click Remove Listing Item.
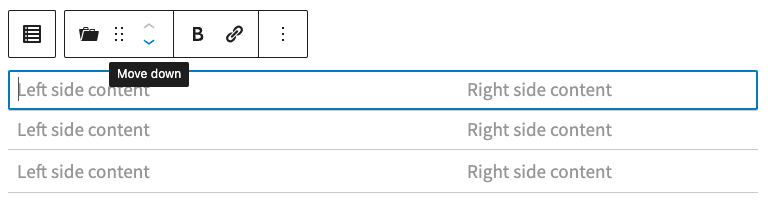
Re-order Listing items
Click on the listing item that you’re moving, then use the block arrows in the pop-up Formatting bar to move it up or down to its new location.
How to add a column
After adding a Listing block, select Block from the right sidebar of the editor. The Wrap the list items toggle will control whether the Listing displays in one or two columns.